


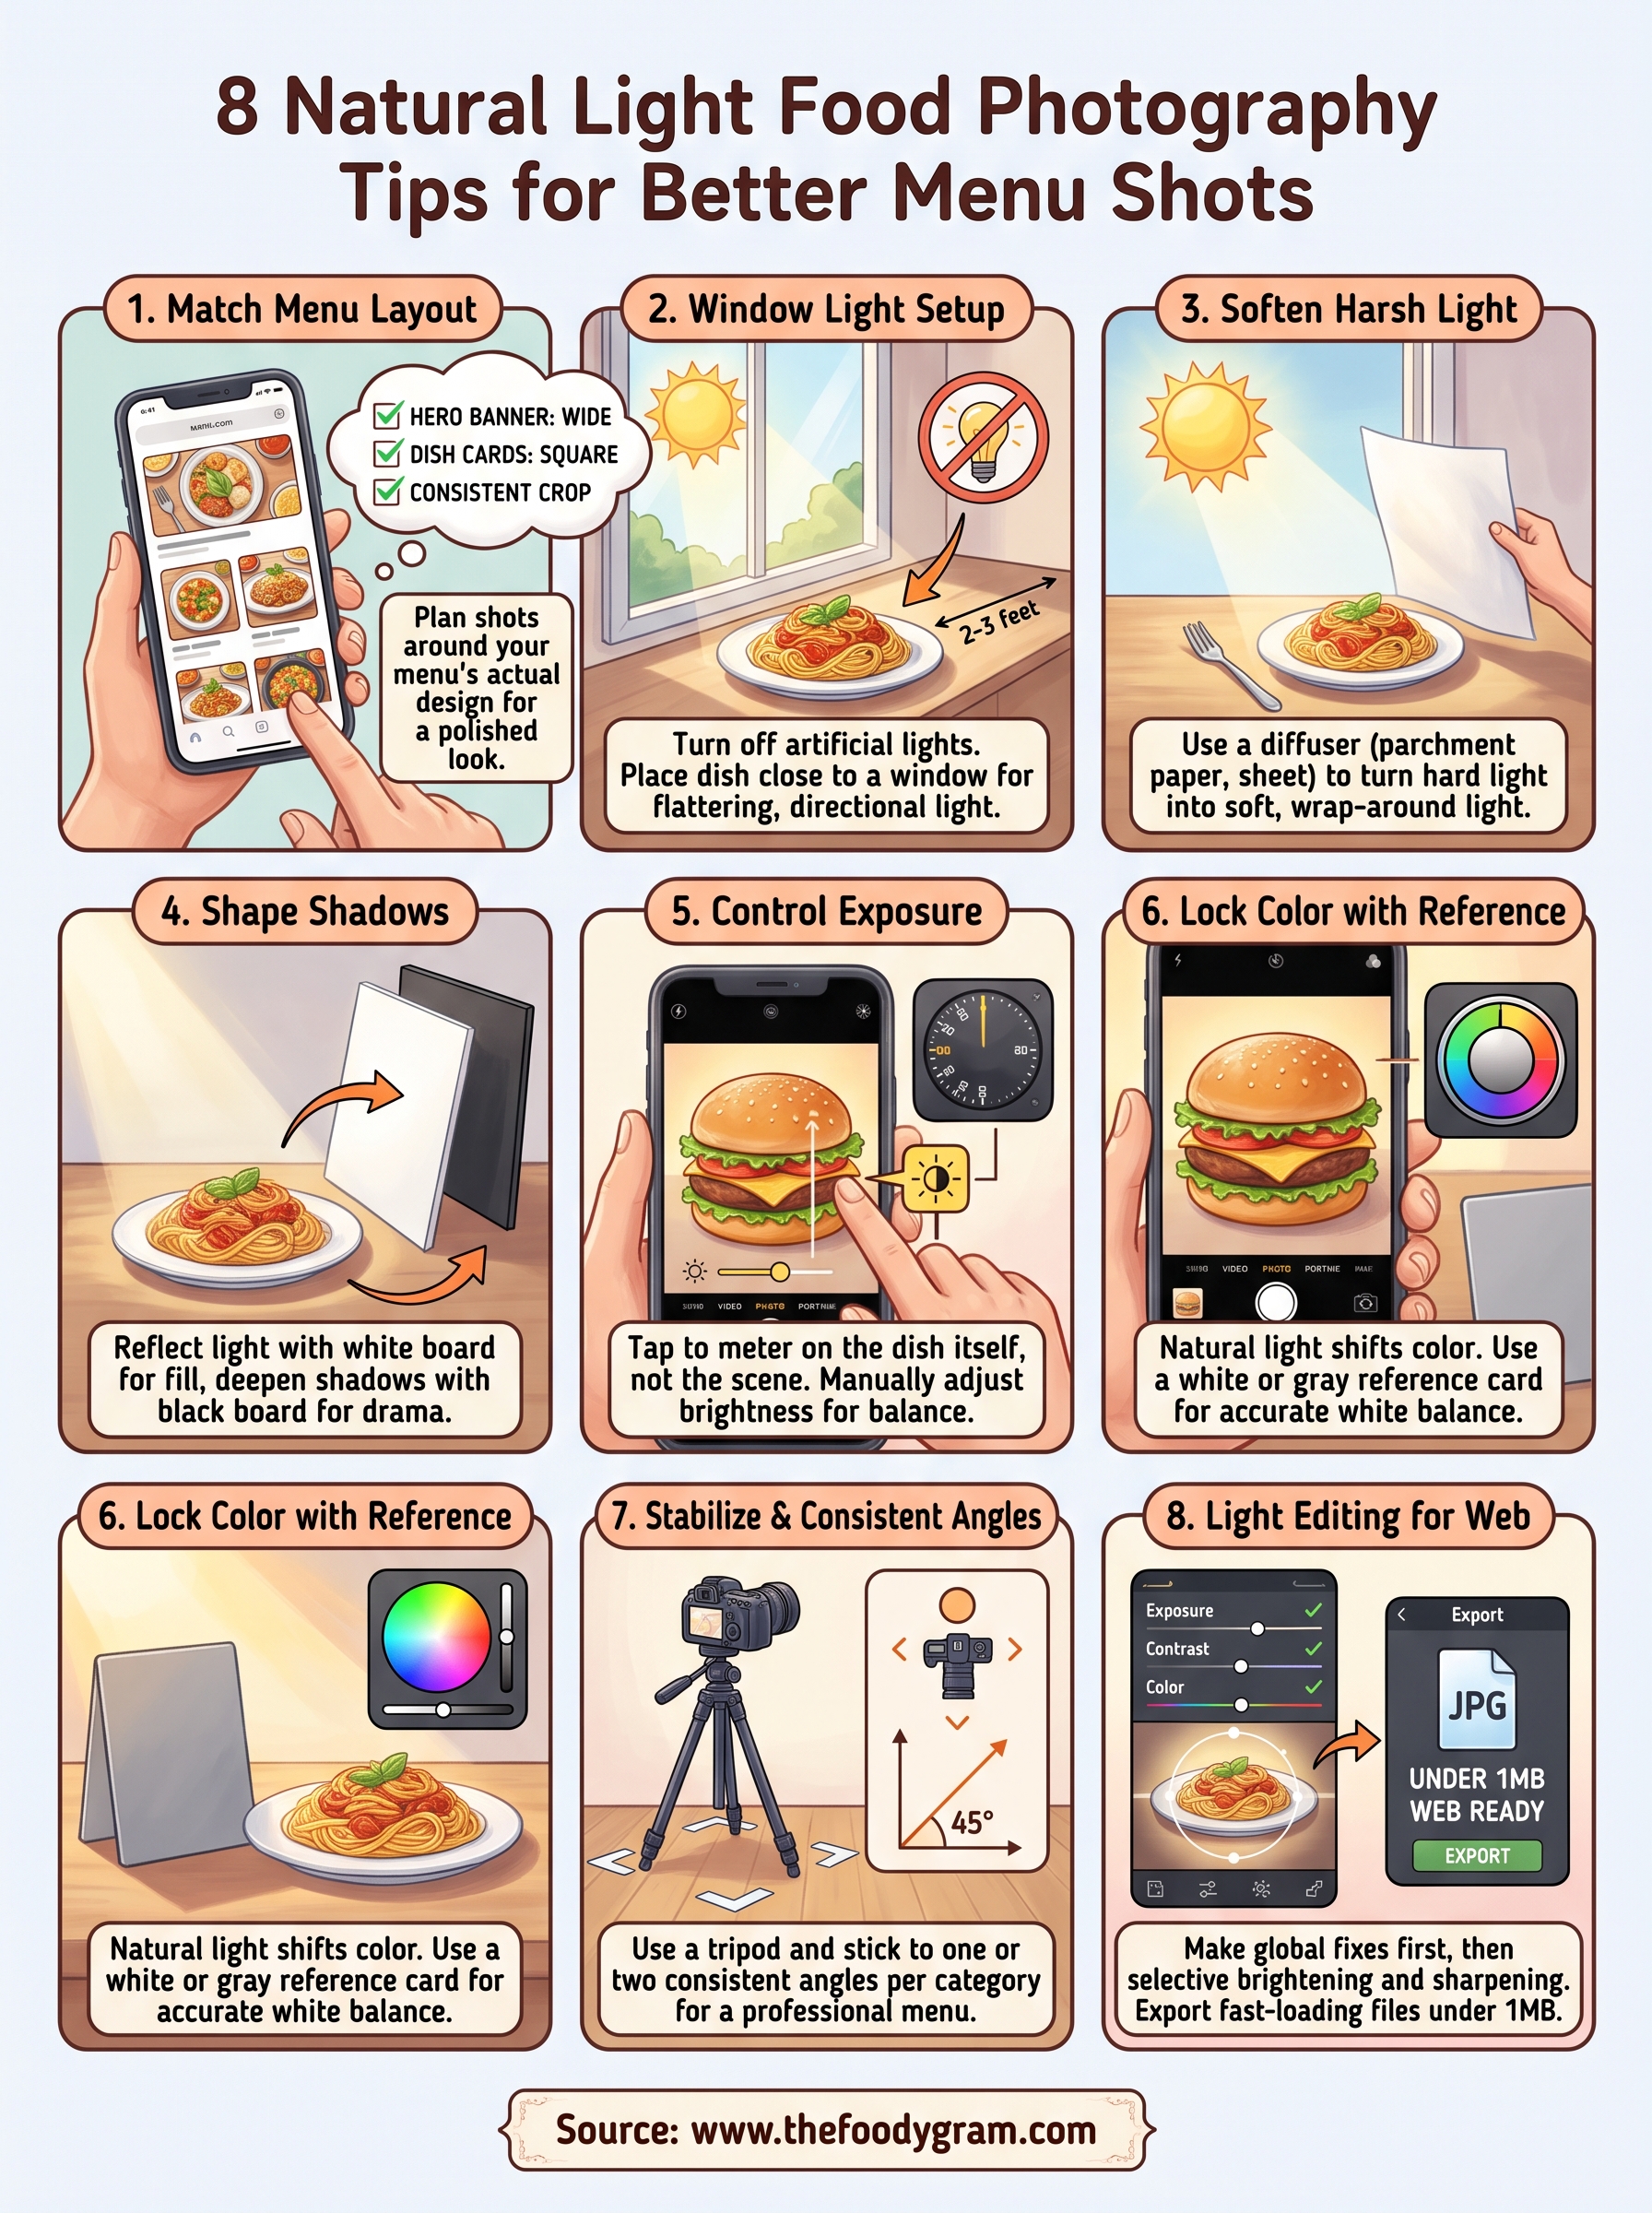
8 Natural Light Food Photography Tips for Better Menu Shots
Your menu photos do more selling than any description ever will. A dish that looks flat and dull on screen gets scrolled past, but a shot with warm, natural shadows and honest color? That stops a thumb mid-scroll and turns a browser into a buyer. You don't need a studio or expensive lighting rigs to make that happen, either. These natural light food photography tips will help you capture shots that look professional using nothing more than a window and a few basic tools.
At The Foody Gram, we build branded restaurant websites with commission-free online ordering, and we see the difference strong photography makes every day. Restaurants that invest even a little time into their menu images consistently drive more direct orders through their own site. The food has to look as good on screen as it tastes on the plate.
This guide breaks down eight practical techniques for using natural light to photograph your dishes at home or in your restaurant. Whether you're shooting for your website menu, social media, or both, these tips will help you create images that actually convert, no professional photographer required.
1. Shoot to match your restaurant menu layout
Before you pick up your phone or camera, decide exactly how each photo will be used. One of the most common mistakes restaurant owners make is shooting images that don't fit their menu layout, forcing awkward cropping or leaving odd white space around dishes. Planning your shots around your actual menu design saves time and gives your site a polished, consistent look from the first image to the last.
Decide where the photo will live on your site
Every photo has a destination, and that destination controls the shape and size you need to shoot for. A hero banner image at the top of your page needs a wide landscape crop, while individual dish cards on a menu grid typically call for a square or portrait ratio. Check your live menu layout first, note the image containers, and shoot specifically for those dimensions before you start.
Choose a consistent crop for every dish
Once you know the ratio, lock it in for your entire menu. Shooting all your mains at the same crop and distance creates a visual rhythm that makes your menu feel intentional rather than pieced together. If your pizza photos are overhead squares and your pasta shots are angled rectangles, the menu looks chaotic. Pick one approach and apply it across every category.
Consistency in crop and angle does more for your menu's overall look than any single "perfect" shot will.
Build a repeatable shot list for your menu
A shot list keeps your photography session organized and prevents you from missing items. List every dish by category, note the crop ratio for each, and mark any special angles you want to capture. This document becomes your production checklist, so you can move through a full menu shoot in one session without backtracking or reshooting.
Prep images for The Foody Gram menu sections
The Foody Gram's menu sections support clean, high-resolution images that load fast on mobile. When you export your final files, aim for images under 1MB with the correct aspect ratio for your dish cards. Uploading properly sized images from the start means your menu renders sharply on every device without extra technical work on your end.
2. Build a simple window light setup
The most powerful tool in these natural light food photography tips is the window you already have. A single window gives you directional, flattering light that makes dishes look better without any expensive gear or complicated setup.
Pick the best window and turn off indoor lights
Look for a window that receives indirect daylight rather than direct sun. North-facing windows in the U.S. deliver the most consistent light throughout the day. Once you pick your window, switch off every artificial light in the room to avoid mixed color temperatures that make food look orange or muddy.
Place the dish close to the window for clean light
Distance has a bigger impact on your shot than most people expect. Position your dish within two to three feet of the window to get bright, directional light with natural falloff behind the plate. Moving the dish further back flattens the light and reduces depth, which makes food look dull and two-dimensional on screen.
The closer your dish sits to the window, the more natural dimension and contrast your photos will carry.
Choose side light or backlight based on the food
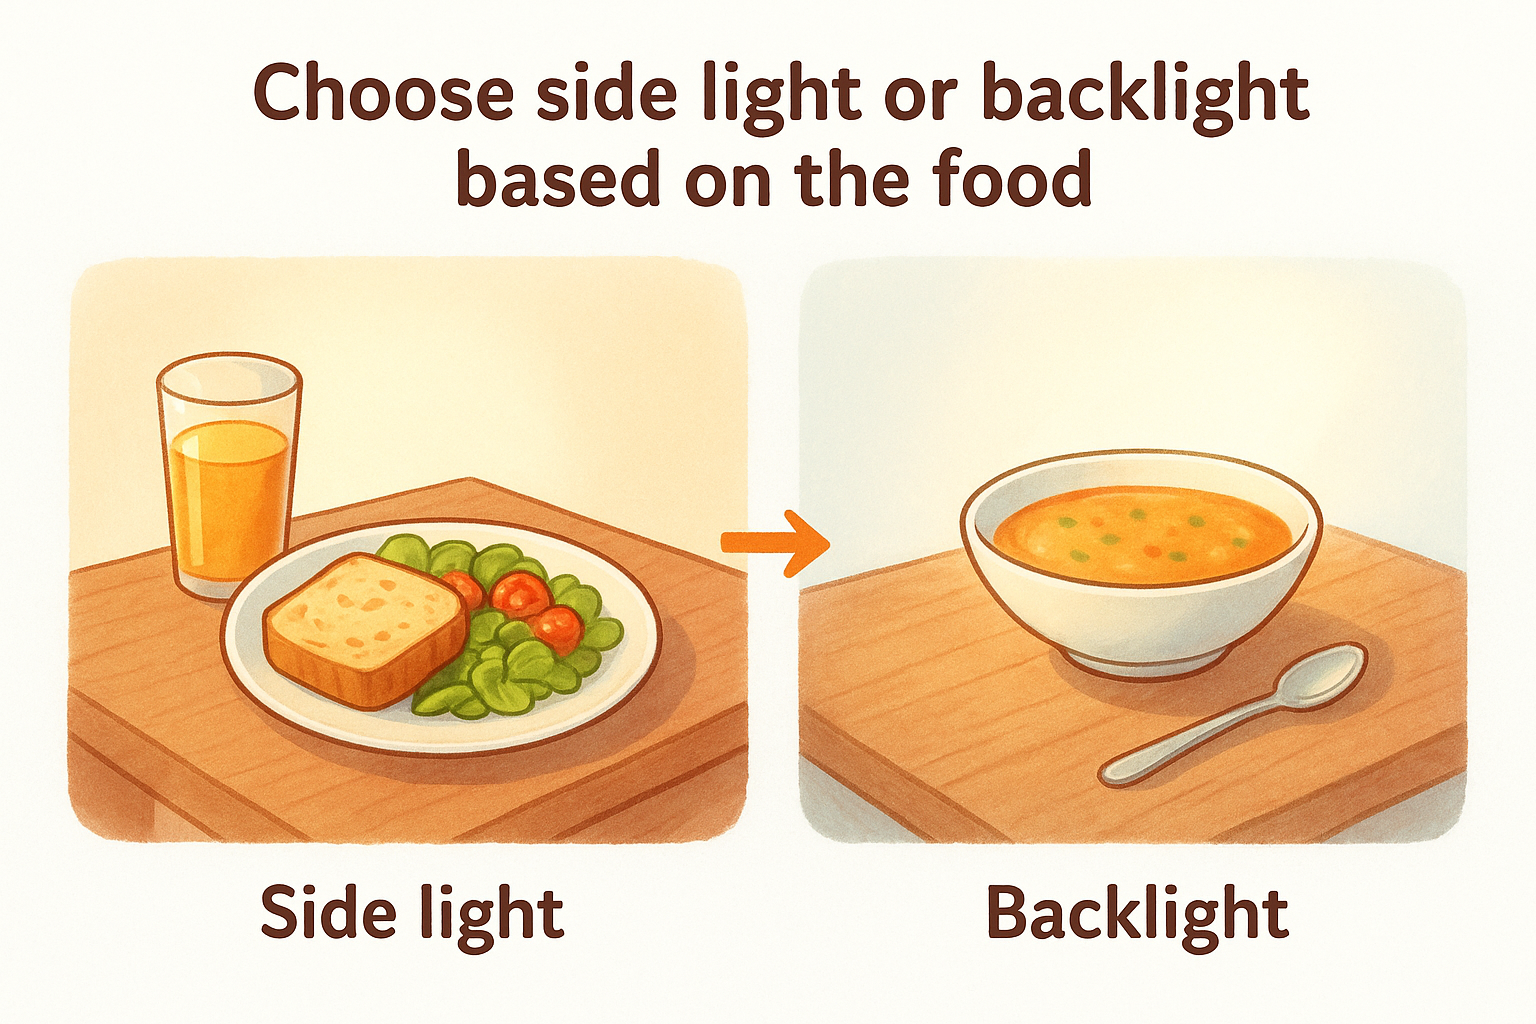
Your light angle should match what you are shooting. Side light, hitting the dish at roughly 90 degrees, works best for textured foods like bread, grilled meat, and grains. Backlight, positioned behind the dish, suits drinks, soups, and translucent ingredients that glow when lit from behind.
Set your shooting surface and background fast
Choose a clean, neutral surface such as a wooden board, marble slab, or simple linen cloth. Keep your background simple and low-contrast so nothing pulls attention away from the dish itself.
3. Soften harsh light with diffusion
Window light is not always cooperative. On bright days or when direct sun cuts across your shooting surface, you get hard light that produces sharp shadows and washes out texture. Diffusion fixes this fast and is one of the most important natural light food photography tips for shooting inside a restaurant or home kitchen.
Spot hard light and harsh shadows quickly
Check the shadow your dish casts on the surface. Sharp, well-defined shadow edges tell you the light is hard. You will also see bright hot spots on glazed sauces or white plates where the light hits most directly. Both signals mean you need to add diffusion before you shoot a single frame.
Use a diffuser to turn hard light into soft light
Place a white diffusion panel between your window and the dish to scatter the light before it reaches your food. This spreads the beam and produces softer, more even illumination that wraps around the dish without killing the natural depth your window placement already created.
A simple diffuser changes the character of your light more than switching to a different window ever will.
Adjust diffuser distance to control contrast
Positioning matters here. Placing the diffuser closer to the window produces softer, lower-contrast light. Pulling it closer to the dish adds a bit more directionality. Make small adjustments and check the shadows each time rather than large moves that are hard to reverse.
Use DIY diffusion when you need it
You do not need commercial equipment to get this right. White parchment paper, a thin white bedsheet, or white tissue paper taped across the window frame all work as effective diffusers. The material needs to be thin enough to pass light while dense enough to scatter it evenly across your dish.
4. Shape shadows with reflectors and negative fill
Diffusion controls the quality of your light, but reflectors and negative fill control where the shadows land and how deep they run. This is one of the most underused techniques in natural light food photography tips, and it costs almost nothing. Two sheets of foam board give you full creative control over the mood of every shot.
Bounce light with white foam board for open shadows
Place a white foam board on the opposite side of the dish from your window to bounce light back into the shadow side. This fills in dark areas without adding a second light source, keeping the image feeling natural. Position the board at an angle and move it closer or further until the shadow side lifts to a level that still shows depth but does not block dish detail.
Reflected fill light keeps the dish readable on both sides without flattening the natural character your window setup already built.
Add mood with black foam board for deeper shadows
Swap the white board for a black foam board and you pull light away from the shadow side instead of adding it. This technique, called negative fill, deepens contrast and adds drama that works well for rich, dark foods like braised meats or chocolate desserts.
Fine-tune with small moves, not big changes
Adjust your board in two-inch increments and check the result each time. Small moves shift the shadow depth noticeably, while large moves often overshoot your target.
Avoid flat lighting that hides texture
Flat lighting with no shadow at all strips texture from food and makes everything look printed on the plate. Keep at least a subtle gradient across the dish surface to show crust, glaze, and grain.
5. Control exposure on phone or camera
Exposure is one of the easiest things to get wrong in natural light food photography tips because cameras and phones read the scene, not the dish. If you let the device decide, you will end up with images that look technically correct but feel lifeless. Taking control of your exposure before you fire the shutter is what separates a consistent, professional-looking menu from a random collection of snapshots.
Set exposure intentionally instead of trusting auto
Your camera or phone meters the whole frame and picks a compromise. That compromise often overexposes a light background or underexposes a dark sauce to balance everything at once. Tap directly on the hero element of the dish on your phone screen to force the meter to read that spot, or use your camera's spot metering mode.
Metering off the dish itself rather than the scene gives you accurate exposure where it actually counts.
Use manual controls or exposure compensation
On a phone, press and hold the subject to lock focus and exposure, then drag the sun slider to adjust brightness. On a camera, dial in exposure compensation or shoot in manual mode so you set aperture, shutter speed, and ISO yourself.
Protect highlights on white plates and glossy sauces
Blown highlights on white plates or glazed surfaces look cheap and lose all plate detail. Slightly underexpose by a third to a half stop when shooting light-colored dishes.
Keep ISO low and shutter speed safe
Keep ISO at 100 or 200 to avoid grain that muddy texture in close-up shots. Use a shutter speed of at least 1/60s to prevent any motion blur from hand-holding.
6. Lock color with white balance and a reference
Color accuracy is one of the most overlooked areas in natural light food photography tips, and it shows up fast on a menu. A dish that looks warm and golden in real life can photograph with a cool blue cast or a muddy green tint depending on the light conditions in your space. Getting color right before you edit saves you significant time in post-processing and keeps every dish looking honest and appetizing.
Understand why window light shifts color
Natural light changes color temperature throughout the day. Morning light runs warmer with a yellow or orange cast, while midday and afternoon light shifts cooler and bluer. Clouds and weather conditions push the color even further in either direction. If you shoot at different times or on different days without accounting for this, your menu ends up with inconsistent dish colors that look mismatched side by side.
Set a custom white balance when you can
Most cameras let you set a custom white balance by photographing a white or gray reference card under your shooting light. Your phone's manual camera mode often includes a Kelvin slider that lets you dial in a consistent setting session to session.
Setting white balance manually before you shoot protects your food color through the entire editing process.
Use a neutral reference to correct color later
If you shoot in JPEG on your phone without manual controls, place a plain white napkin or gray card in the first frame of each shooting session. Use that reference shot in your editing app to correct the color temperature across the whole batch quickly.
Keep food color believable, especially reds
Reds shift fast under cool window light and can look pink or washed out. Pull your red and orange tones back to a natural, saturated warmth in editing rather than pushing them brighter, which makes food look artificial. The goal is a dish that matches what a customer will actually receive, not a version that oversells and disappoints on delivery.
7. Stabilize and keep angles consistent
A shaky shot or a different camera height for every dish makes your menu look unprofessional even if the light is perfect. Stabilizing your camera and committing to consistent angles is one of the quietest yet most impactful of the natural light food photography tips in this guide. Small inconsistencies across dishes compound into a menu that feels unfinished and pieced together.
Use a tripod to repeat shots and speed up workflow
A tripod locks your camera position so you can move dishes in and out of frame without re-adjusting your setup each time. This speeds up production significantly when you have a full menu to cover in one session. Mark your tripod feet positions on the floor with tape so you can return to the exact same setup when adding new dishes later.
Pick one or two angles that sell the dish
Overhead works well for flat foods like pizza, flatbreads, and grain bowls. A 45-degree angle suits burgers, stacked sandwiches, and pasta where height and layers matter. Stick to one primary angle per food category rather than mixing approaches randomly across the menu.
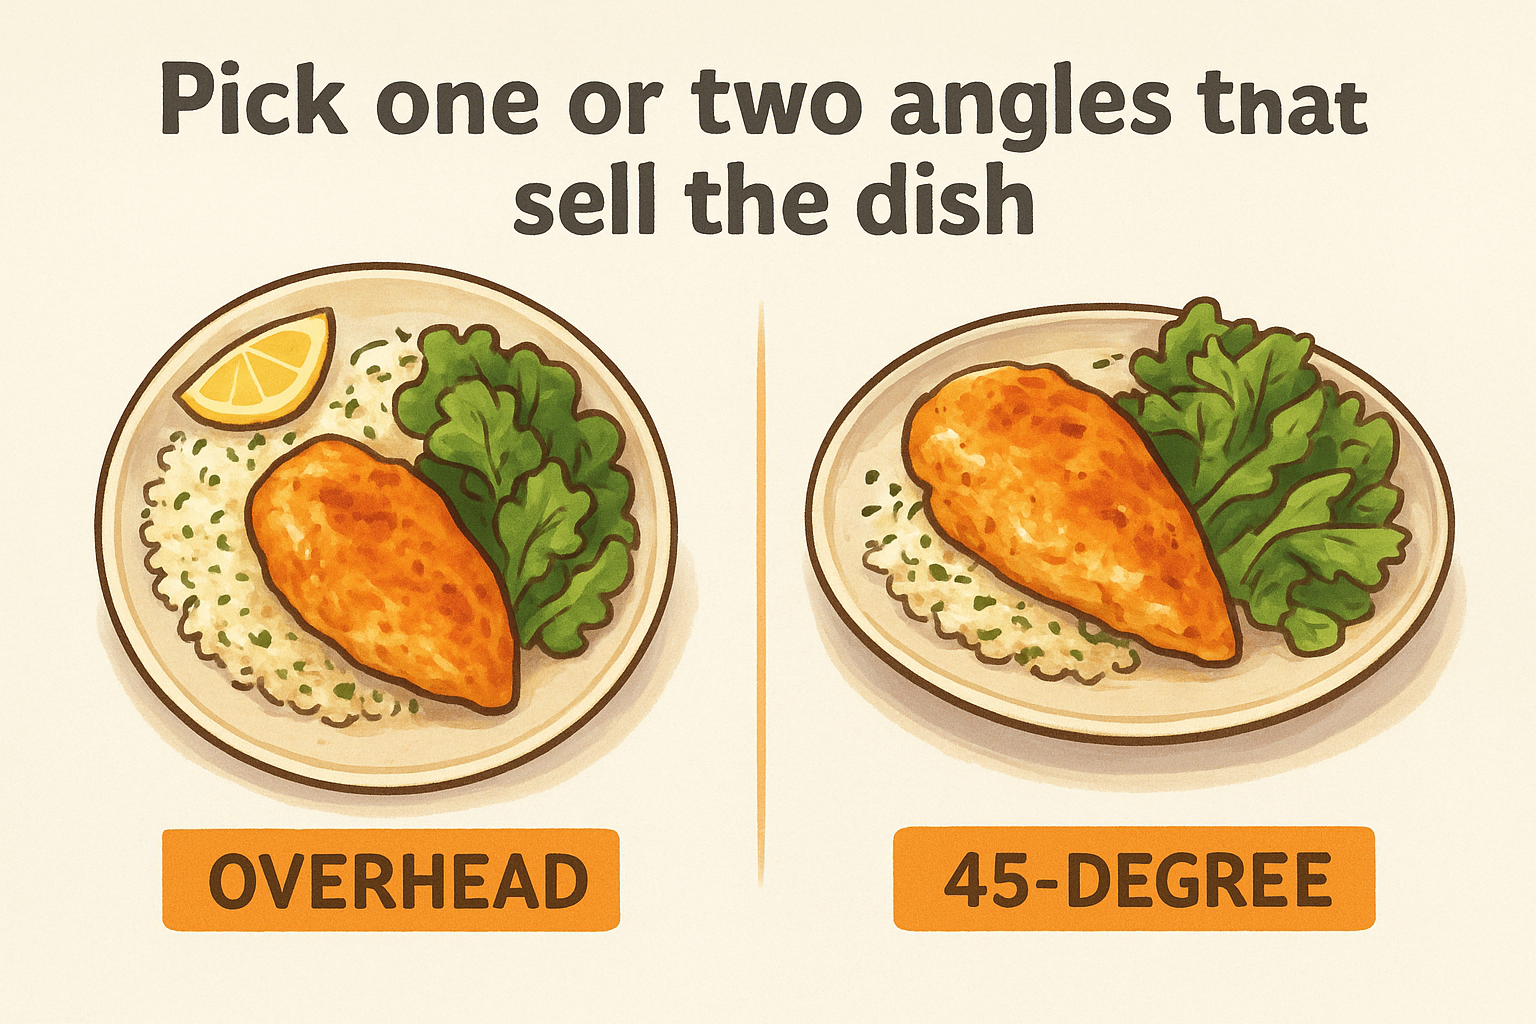
Committing to one or two angles per category gives your menu a visual structure that customers read quickly and trust.
Keep distance and height consistent across the menu
Match your camera-to-dish distance and tripod height for every shot within a category. Inconsistent distances make dishes appear to change size across the menu, which looks careless and confuses the customer's sense of portion.
Avoid distortion from shooting too close
Getting too close with a wide-angle lens, especially on phones, stretches the dish edges and makes food look warped. Back up slightly and zoom in digitally or use a tighter focal length to keep the dish proportions accurate and natural.
8. Finish with light editing for menu-ready files
Even strong natural light food photography tips fall short if your editing process undoes what your window setup built. Keep your edits restrained and intentional, treating editing as a refinement step rather than a rescue operation for a poorly lit shot.
Make global fixes first: exposure, contrast, color
Start every image with global adjustments that affect the whole frame. Nudge exposure to where the dish looks naturally bright, add a small contrast boost to separate tones, and confirm your white balance matches your reference shot. Correct these three settings in order before touching anything else, because each one affects how the next adjustment reads on screen.
Getting your global corrections right first prevents selective edits from compounding errors across the final image.
Use selective edits to guide the eye to the hero
Once your global settings look solid, brighten the dish slightly while keeping the edges and background a touch darker. This draws attention to the food without obvious vignetting or heavy-handed effects. Use a radial filter or brush tool in your editing app to target only the dish area.
Sharpen for texture and keep noise under control
Apply sharpening selectively to the food surface to bring out crust, glaze, and grain detail. Avoid sharpening the background. If you shot at a higher ISO and see digital noise, reduce luminance noise gently so texture stays intact.
Export the right sizes for web menus
Save your final files as high-quality JPEGs under 1MB with the exact pixel dimensions your menu layout requires. Smaller file sizes keep your menu pages loading fast on mobile, which directly supports a better ordering experience for your customers.
Quick wrap-up
These natural light food photography tips give you a complete system to build from the ground up. Start with a window, position your dish close, add diffusion when the light turns harsh, and use foam board to shape your shadows exactly where you want them. Control your exposure and white balance before you shoot, keep your angles consistent across every dish category, and finish with restrained edits that clean up what your light setup already built.
Strong menu photography works hardest when it lives on a fast, well-designed restaurant website that puts orders directly in your pocket. If you are still sending customers to a third-party app and losing a cut of every order, it is time to change that. The Foody Gram gives you a branded, commission-free ordering site built around your menu and your customers. Check out our restaurant website plans and pricing and see what direct ordering can do for your margins.