


Best Lighting for Food Photography: A How-To Guide
Your food photos are the first thing a hungry customer sees before they decide whether to order from your restaurant or scroll past you. If the lighting is off, even a perfectly plated dish looks flat, greasy, or gray, and that costs you clicks. Figuring out the best lighting for food photography isn't about buying expensive gear. It's about understanding how light behaves around food and knowing which setup fits your kitchen, your menu, and your camera.
This guide gives you a direct answer: natural window light works best for most restaurants starting out, but a simple artificial setup with diffusers and reflectors gets you consistent, repeatable results any time of day. We'll show you exactly how to position your light source, what equipment actually matters, and which mistakes make food look unappetizing on screen.
We built this guide because your website's food photos carry the same weight as your menu descriptions. At The Foody Gram, we help restaurants run their own branded ordering site instead of handing customers to third-party apps, and great photography is what makes that site convert. Below, you'll find practical steps, gear recommendations, and setup tips you can use with your phone or a DSLR, starting today.
Why lighting makes or breaks food photos
Light is the ingredient customers never see but always taste with their eyes first. A steak photographed under harsh overhead fluorescents looks gray and lifeless, while the same steak shot near a window at 4pm looks like it's still sizzling. This isn't an accident. Light direction and quality determine whether your food looks fresh or forgettable, and that difference shows up directly in your online order numbers.
How light reveals texture and color
Good lighting shows the crisp edge of a fried chicken skin, the steam rising off pasta, and the glossy shine on a glazed donut. Bad lighting flattens all of that into a single dull tone. Directional light, meaning light that hits the food from one clear angle rather than bouncing evenly from everywhere, creates the shadows and highlights that make texture visible. Overhead ceiling lights, the kind found in most restaurant kitchens, scatter light straight down and erase those shadows, which is why food shot under them looks washed out no matter how good the plating is.
The right light doesn't just illuminate food, it makes texture and color readable to the eye.
Why appetite appeal depends on it
Researchers and food stylists have long known that visual cues drive hunger before taste does. Warm, soft light triggers a different emotional response than cold, blue-tinted light. That's part of why the National Restaurant Association has repeatedly flagged photo quality as a factor in online ordering decisions, since customers browsing a menu app or website judge dishes almost entirely on the photo in front of them. If your lighting makes a burger look gray instead of juicy, you lose that customer before they read a single word of your description.
The most common lighting mistakes
Most restaurant owners don't get bad photos because of a cheap camera. They get bad photos because of predictable lighting errors that are easy to fix once you know what to look for.
- Shooting under mixed light sources (fluorescent ceiling lights plus a window) creates uneven color casts that no filter fixes cleanly
- Using on-camera flash, which flattens the dish and creates harsh, unflattering shadows directly behind the plate
- Placing the light source directly overhead, which causes shadows to fall straight down and hide texture on the sides of the food
- Shooting in dim ambient light and boosting ISO, which introduces grain and muddies fine detail like herbs or sauce drizzle
- Ignoring color temperature, so white plates read yellow, blue, or green depending on the bulbs nearby
Solving these problems doesn't require a studio. Once you understand where light is coming from and how it interacts with your dish, you can control it with tools that cost less than a dinner service's worth of ingredients. That control is exactly what the next four steps walk you through, starting with the most important decision: choosing the right light source for your kitchen and your shooting schedule.
Step 1. Choose your light source
Before you touch a diffuser or reflector, decide where your light is coming from. Natural window light and artificial continuous lighting are the two realistic options for a restaurant shooting product photos on a regular basis, and each one solves a different problem depending on your kitchen layout and your shooting schedule.
Natural window light
A north-facing or east-facing window gives you soft, diffused light for most of the morning without any equipment cost. Position your shooting table within three to five feet of the window, and you'll get the same soft falloff that professional food photographers pay thousands of dollars in strobes to replicate. The catch is timing. You're locked into whatever hours the sun cooperates, which makes natural light a poor fit for restaurants that only have downtime late at night or need photos shot on demand between lunch and dinner service.
If your kitchen has a bright window and free mornings, start there before spending a dollar on gear.
Artificial continuous lighting
A continuous LED panel, rated between 5000K and 5600K to match daylight color temperature, gives you a repeatable setup any time of day. Unlike a flash, a continuous light lets you see the shadow pattern in real time before you shoot, which matters when you're adjusting plating on the fly. Budget LED panels from photography brands run $60 to $150 and include adjustable brightness, which is enough for a two-light setup covering a single shooting table.
Comparing your two options
| Factor | Natural window light | Artificial LED panel |
|---|---|---|
| Cost | Free | $60 to $150 per light |
| Consistency | Changes with time of day and weather | Same output every shoot |
| Setup speed | Instant, no gear | 5 to 10 minutes |
| Best for | Daytime shoots near a window | Evening shoots, dark kitchens |
Most restaurants end up using both. Shoot near the window when the light is good, and fall back on your LED panel for evening menu updates or when clouds roll in. Whichever you pick, the next step, positioning your key light, is what actually turns that light source into usable, appetizing photos.
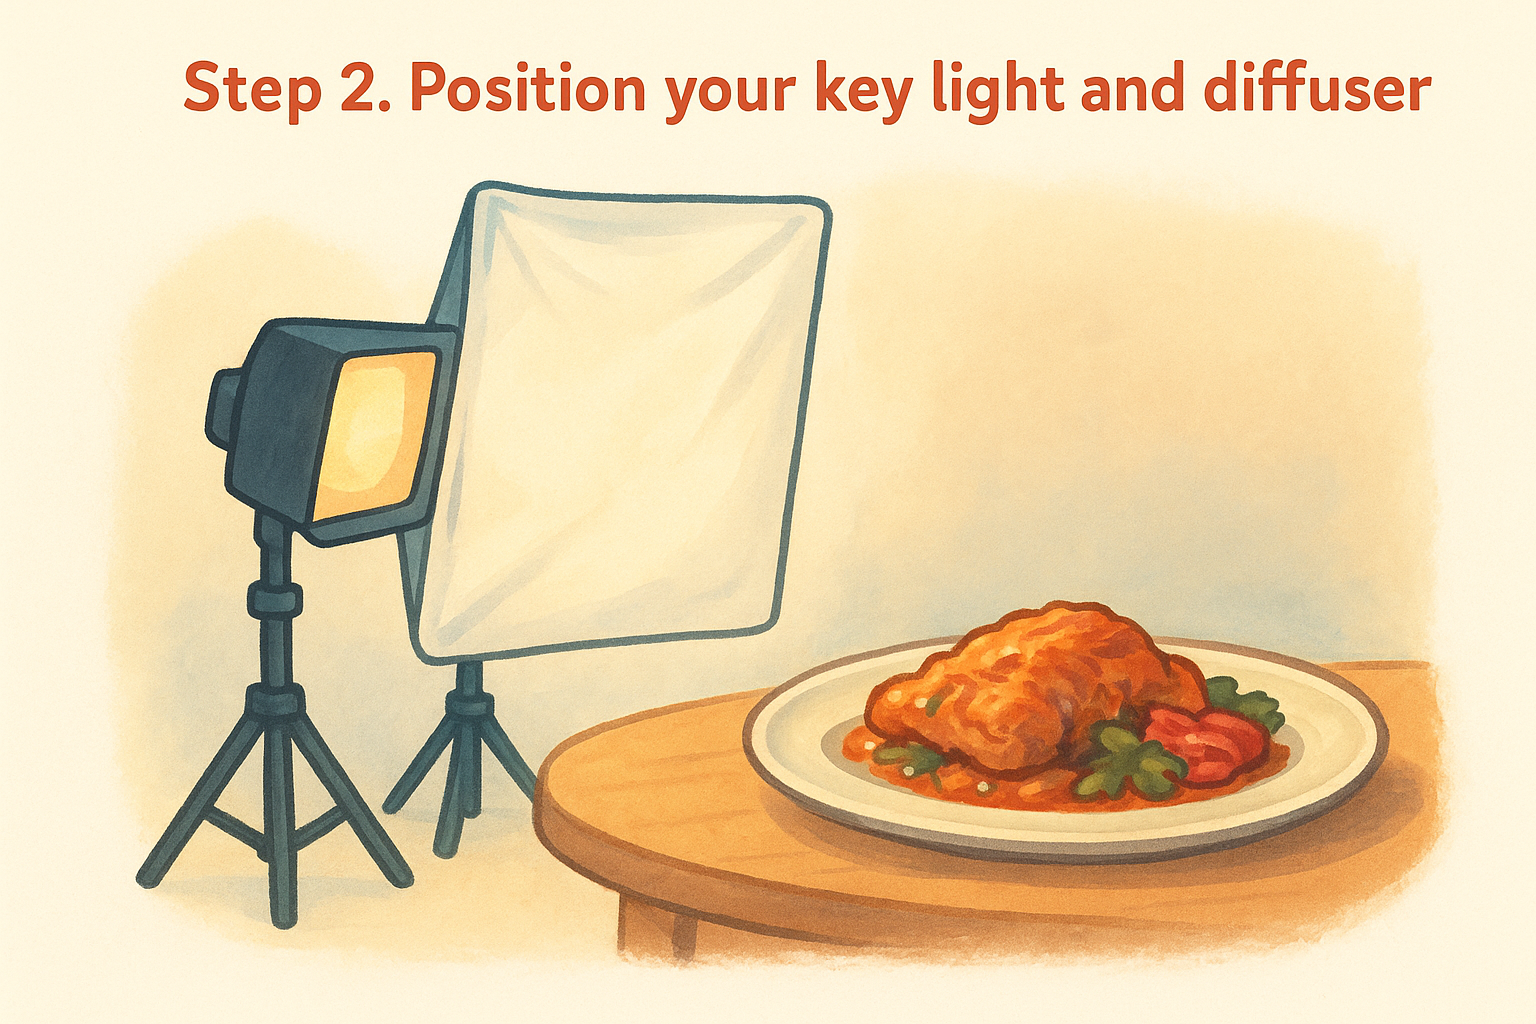
Step 2. Position your key light and diffuser
Once you've picked a light source, the next move is placement. Side lighting, meaning your light sits roughly 90 degrees from your camera, sculpts the food with visible shadows and highlights that a straight-on flash can never produce. Back lighting, where the light sits behind the dish and slightly to one side, works even better for steam, glossy sauces, and drinks, because it makes liquid and glaze glow instead of going flat.
Finding the right angle
Start with your key light at a 45 to 90 degree angle from your camera lens, roughly level with the food or slightly above it. Move it a few inches at a time and check your camera screen after each adjustment, since even small shifts change where the shadow falls across the plate. Avoid placing the light directly behind the camera, pointed straight at the dish, because that setup flattens texture and erases the shadows that make food look three-dimensional.
Side and back lighting sculpt food, front lighting flattens it.
Softening the light with a diffuser
Raw light straight from a bulb or a window creates harsh, high-contrast shadows that look unnatural on skin, sauces, and glazed surfaces alike. A diffuser spreads that light source across a wider area before it hits your food, softening the shadow edges without killing the shape entirely. You don't need a professional softbox to get this effect:
- A white bedsheet or shower curtain clipped over a window cuts harsh midday sun into soft, even light
- A collapsible 5-in-1 reflector disc with a translucent diffuser panel (roughly $20 to $40) works for both window light and LED panels
- Wax or parchment paper taped over a small LED panel softens hot spots in a pinch, though it's a short-term fix, not a permanent one
Position your diffuser between the light source and the food, about one to two feet from the dish. Closer placement gives you softer, larger shadows, while pulling it back sharpens the shadow edges again. Test both distances with your actual plate on the table, since ceramic, glass, and dark wood surfaces all reflect diffused light differently, and what looks right on a white plate might read too dim on a black one.
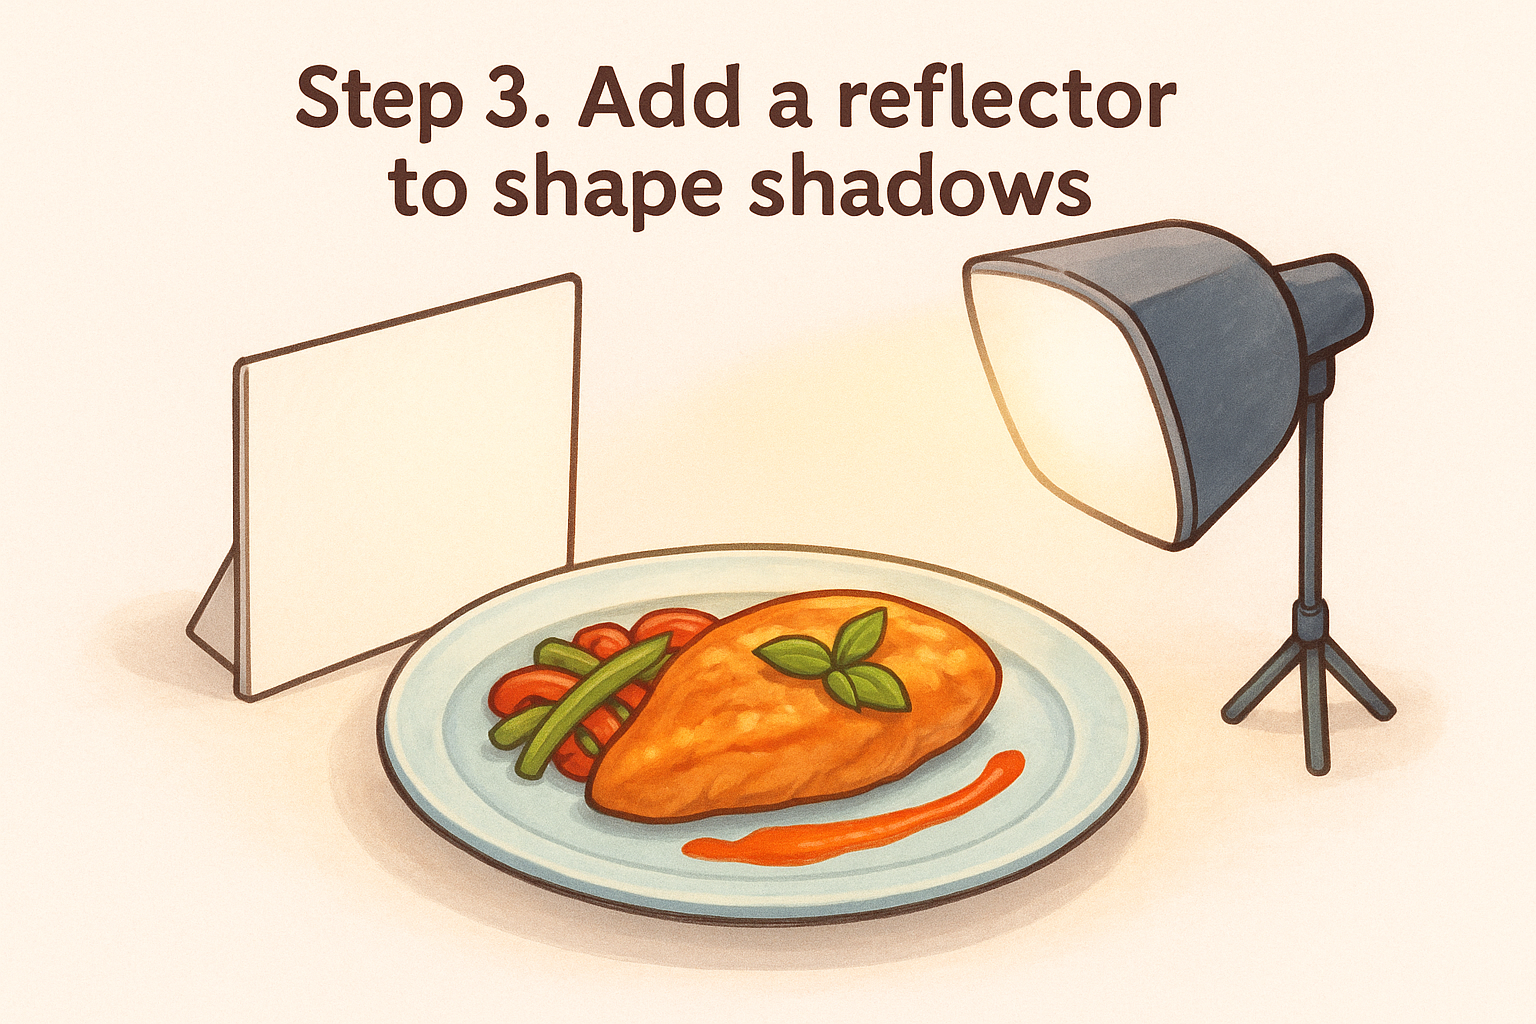
Step 3. Add a reflector to shape shadows
A single key light and diffuser leaves one side of your dish dark, and that shadow can swallow detail on garnishes, sauces, or the far edge of a plate. A reflector bounces some of that light back into the shadow side, filling it in without erasing the shape your key light created. This one step is often what separates a decent home shot from something that looks like the best lighting for food photography setups you see on professional menus.
Why fill light matters
Contrast is good until it hides information a customer needs to see, like the char on a steak or the layers inside a sandwich. Without a reflector, your shadow side often goes almost black on camera, even though your eye barely notices it standing in the room. Fill light brings back just enough detail in that shadow so the dish still reads as three-dimensional, not half-missing.
A reflector doesn't remove shadows, it makes sure they still show detail instead of going black.
DIY reflector options
You don't need to buy anything specialized to bounce light back onto your plate. Several household items work as well as a store-bought reflector disc:
- White foam board ($5 to $10 at any craft store), the most common choice among food photographers for its flat, even bounce
- Aluminum foil taped to cardboard, which throws a slightly brighter, cooler bounce than white foam
- A white poster board or large piece of foam core, good for covering a wider shooting table
- A silver car sunshade, oddly effective and already sized for reflecting strong light
Placing your reflector
Set the reflector opposite your key light, angled toward the shadow side of the dish, roughly 12 to 18 inches away. Tilt it slightly until you see the shadow lighten on your camera screen, without flattening it completely. If the fill looks too strong and the shadow disappears, pull the reflector back a few inches or swap white foam for something less reflective. Once your key light, diffuser, and reflector are all working together, you're ready to fine-tune the details that separate a good shot from a great one.
Step 4. Fine-tune direction, timing, and camera settings
Your key light, diffuser, and reflector are only half the equation. Camera settings decide whether all that careful lighting work actually shows up in the final photo, and the wrong settings can undo everything you just set up. This step is where a lot of restaurant owners lose the shot even after nailing the physical setup.
Timing matters more than you think
Even with a solid artificial setup, shooting near a window still benefits from paying attention to the clock. Late morning and mid-afternoon give you soft, indirect light, while midday sun creates harsh shadows that no diffuser fully tames. Grab your camera and test the same dish at three different times over one day. You'll see a real difference in shadow softness and color warmth, and that test tells you which window hours actually work for your kitchen.
Consistent light beats perfect light. Pick a setup you can repeat every shoot, not one you can only get once a month.
Locking in your camera settings
Food photography rewards a manual approach over auto mode, since auto tends to overexpose bright plates and underexpose dark sauces. Here's a starting point that works with either natural or LED lighting:
| Setting | Recommended range | Why it matters |
|---|---|---|
| ISO | 100 to 400 | Keeps grain out of sauces and herbs |
| Aperture | f/2.8 to f/5.6 | Blurs background, keeps food sharp |
| Shutter speed | 1/60 to 1/125 | Fast enough to avoid blur from hand shake |
| White balance | 5000K to 5600K | Matches daylight, keeps whites accurate |
Adjust one setting at a time and check the screen after each change, the same way you tested your light angles earlier. Phones running a manual camera app can hit most of these same targets, so you don't need a DSLR to apply this table.
Once your direction, timing, and settings are dialed in, take five sample shots of your best-selling dish and compare them side by side. Whichever combination shows the most texture and the truest color is your new default setup, worth writing down so every future shoot starts from the same baseline instead of guesswork.
Putting your new lighting skills to work
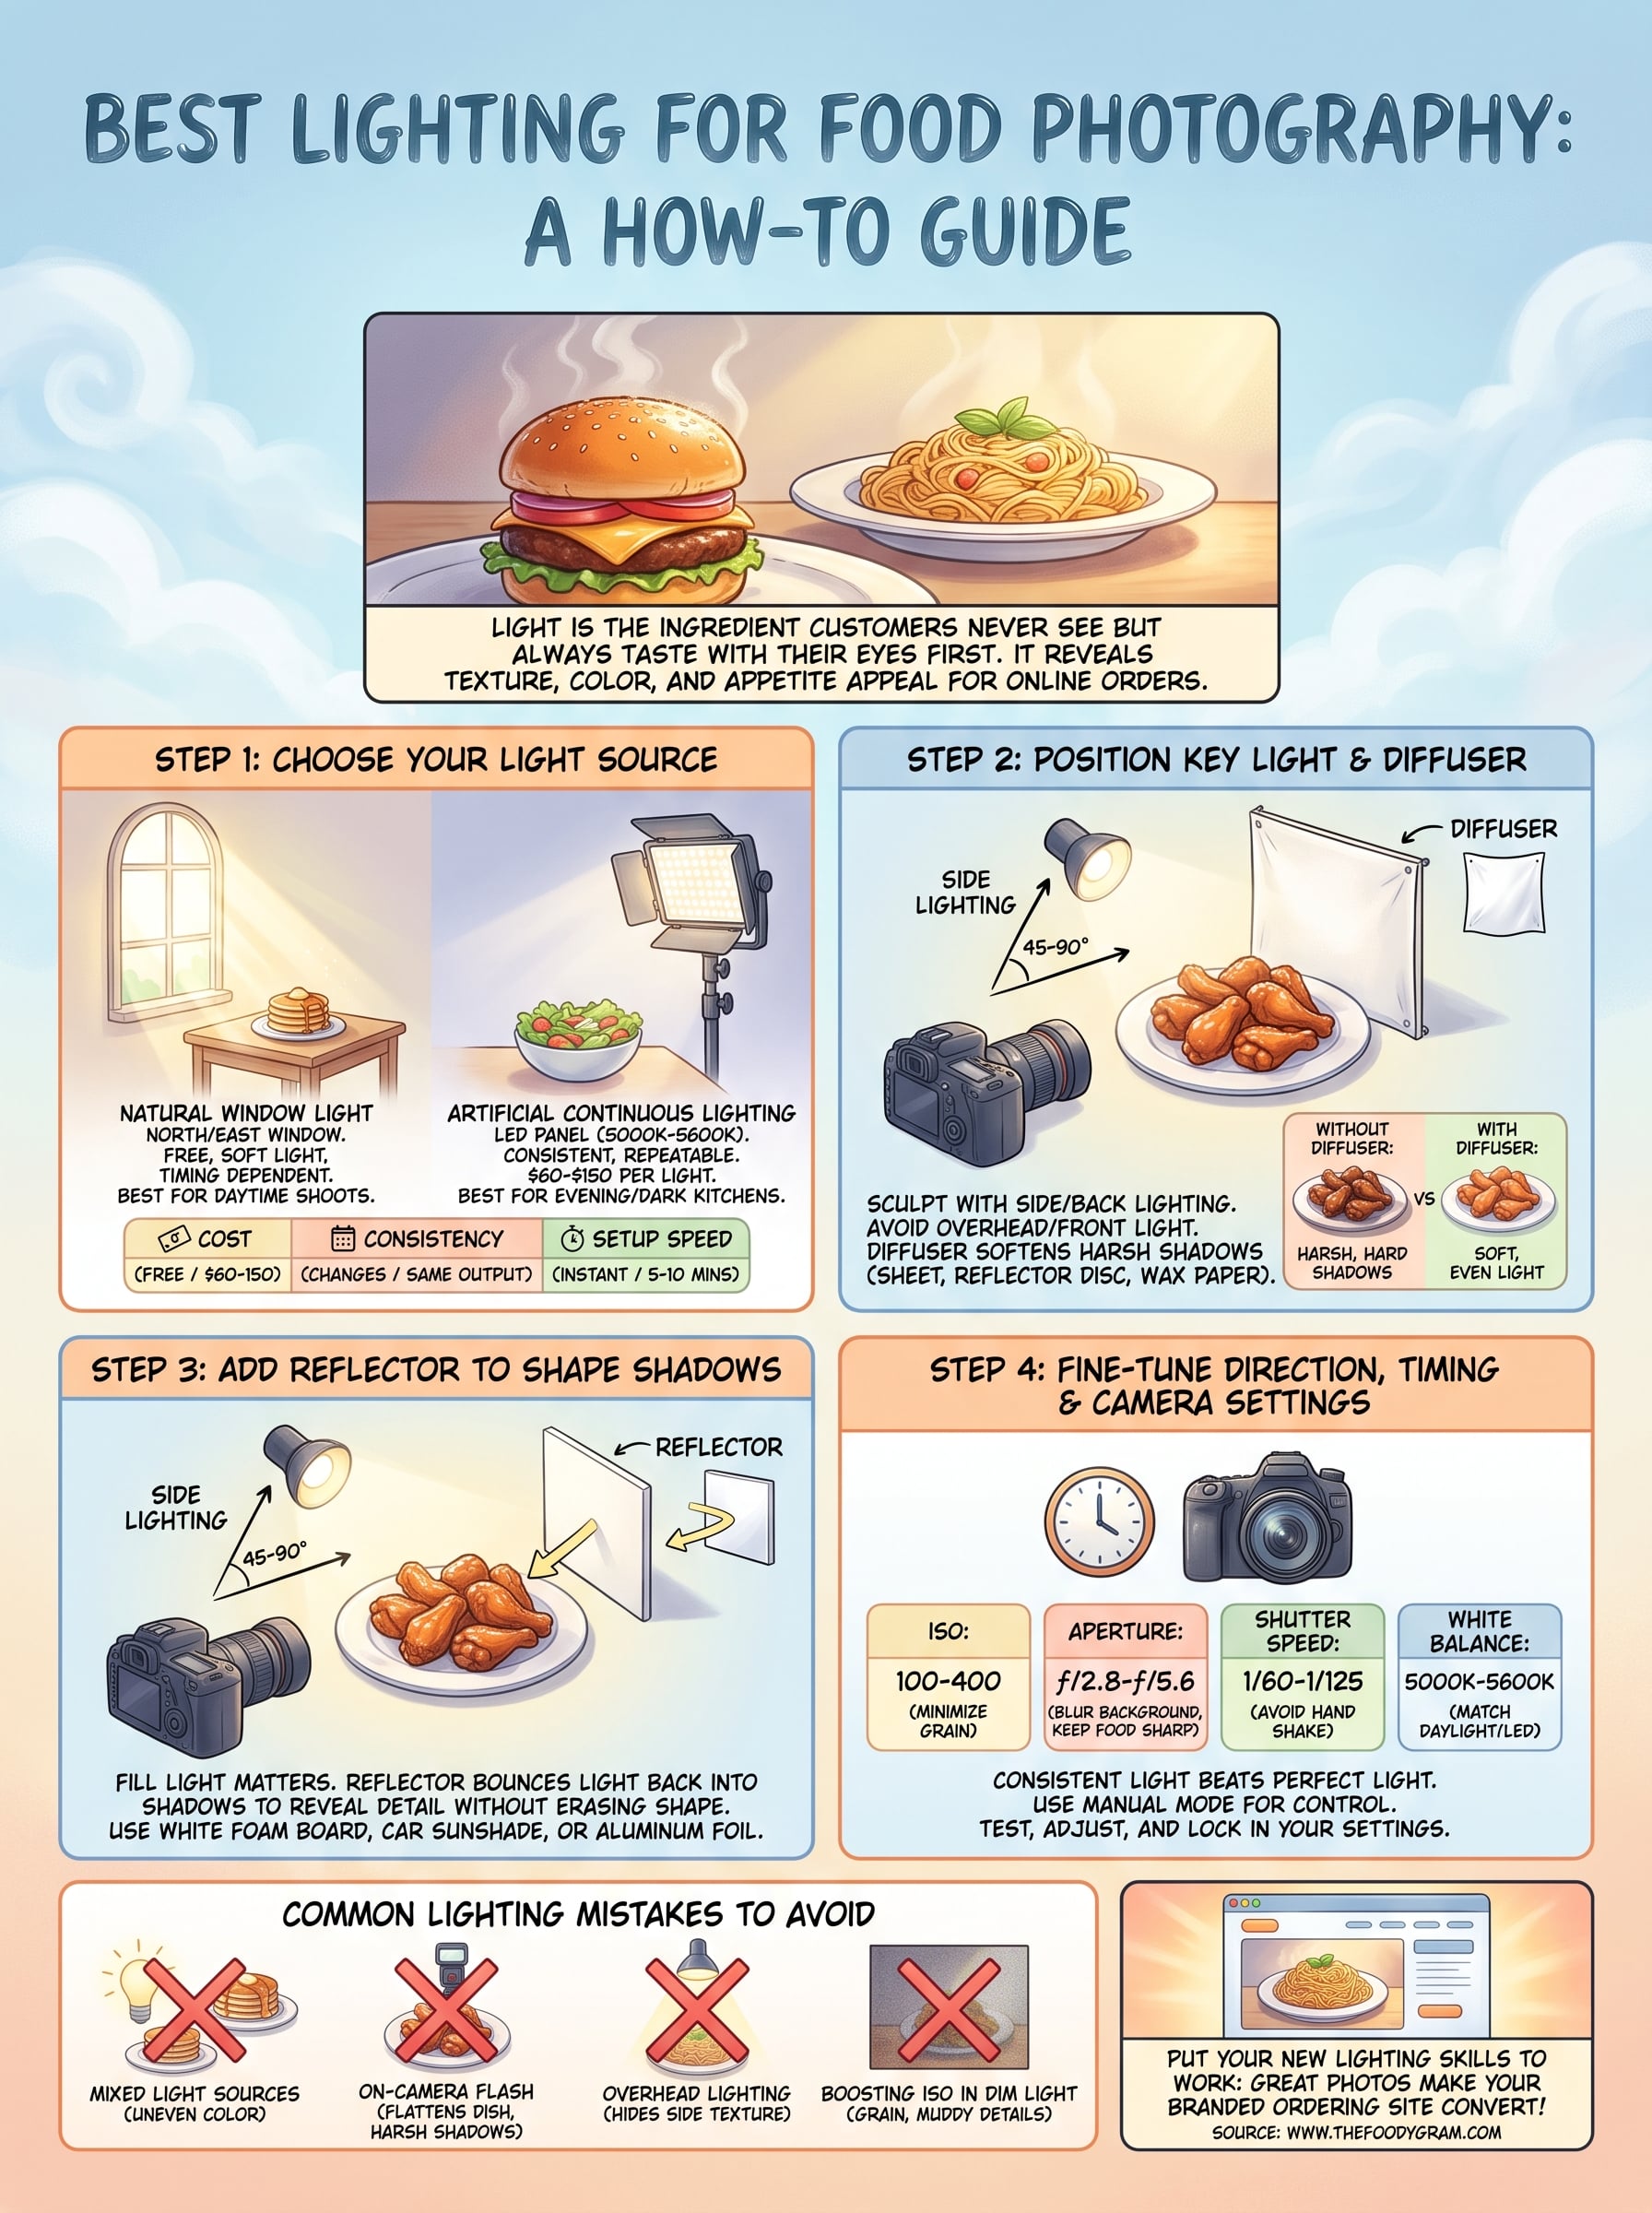
You now have a repeatable system: pick your light source, position your key light and diffuser, add a reflector, then lock in your camera settings. That's the same process professional food photographers use, just built with a foam board and a window instead of a studio budget. The dishes on your menu haven't changed, but how customers see them is about to.
Great photos only pay off if the site displaying them actually converts browsers into orders. A branded ordering site that loads fast, shows your photos clearly, and skips the 30% commission fee is what turns that visual upgrade into real revenue instead of just better engagement on a third-party app. If you're ready to see what that setup costs and what it includes, check out our pricing plans and put your new photos to work where they matter most, on a page you own.